Tuesday • June 10, 2025 •
4TheLoveOfGarden
Banner
  • ABOUT ME
  • GARDENING 101
  • RECOMMENDATIONS
  • RESOURCES & AFFILIATE LINKS
  • SHOP
  • E-BOOK
  • Contact
Author

Angela

Angela

BlogRecipe

Chow Recipe

by Angela December 2, 2016

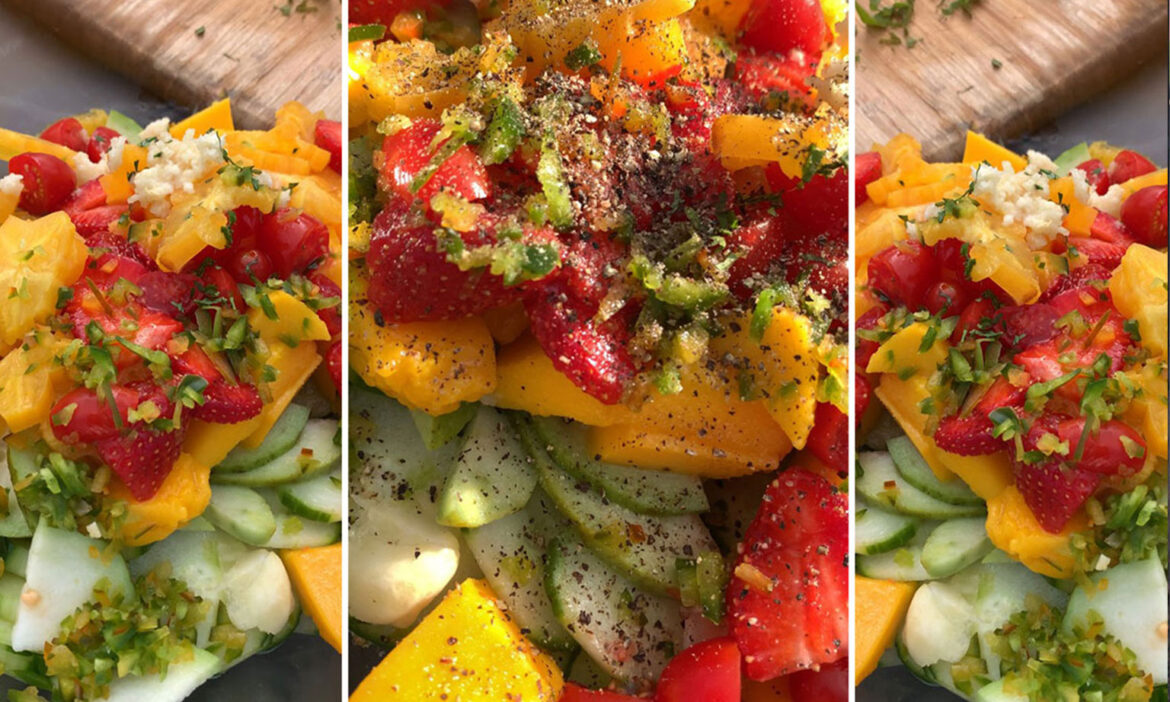
CHOW! is a beautiful and refreshing dish served in most all households in Trinidad as a staple. It is healthy to the body and delightful to the taste buds to say the least! It touched my soul! Ahhhh… So delicious!!!!

It can range from sweet to tart but is traditionally a mixture of sliced fresh fruits and select veggies, garlic, culantro and spicy peppers, put together in a special way that seems almost magical! WOW! 

Make it to your own liking with many different combinations of fruits but just make it! You won’t regret it! It is an absolutely amazing dish and will now be a staple in my home.


Ingredients

1 Guava sliced thin

1 Cucumber sliced thin (half of peel left on)

2 sweet oranges use segments and juice

2 Carambola (Starfruit- 5 Finger) sliced

1 Mango large dice

6 Strawberries sliced

1 jalapeño minced

2 garlic cloves minced

Salt & Pepper to taste

1-2 Limes juiced

Preparation

1 Bunch Culantro chopped (Recao, Culantro, Cilantro ancho, Mexican Coriander)

In a large bowl combine all the ingredients and stir gently. Allow it to sit refrigerated for approximately 1/2 hour before serving. This allows the dish to come together nicely infusing all those amazing complex flavors! Enjoy!

*I also added a few sweet cherry tomatoes (halved) although this isn’t in a traditional Trinidad chow.

December 2, 2016 0 comment
0 FacebookTwitterPinterestEmail
Blog

Raising Backyard Chickens

by Angela August 26, 2016

How to care for baby chicks-chickens
(brooder, feed, water)?

You may be asking yourself if you should get chickens or not. I did the same thing for quite awhile…. Finally, after much thought and research I finally did it and I am very happy with my decision. I have learned so much so far and thought it best to pass along some valuable tips! So, here you go!

There are several things to consider when making this decision as it is quite a commitment. Ask yourself why…. Why do you want chickens? You may want them as pets, to lay eggs, to eat or a combination. I personally am not going to eat my chickens as that isn’t my cup of tea so to speak but I will use their eggs, their poop for fertilizer for my garden-food forest, and care for them as pets.

What kind of chicken to get?

So, now that you have decided to get chickens let’s talk about what kind of chickens you should choose. There are all types of chickens to consider and it is important to look at their inherit qualities before making a choice and not just going by appearance alone. Qualities like are they good Egg Layers? Are they Meat chickens or both? 

Are they big, small, hens, roosters, docile, etc.. It is important to know the facts before you start your flock. Some chickens are more tolerant of the heat or cold, some will lay more eggs, some are more docile than others, etc. and the list goes on. Know what you intend to do with your chickens and research about the different breeds that will best fit your lifestyle. Some popular breeds are ISA Brown, Plymouth Rock, Australorp, Orpington, Easter Egger, Sussex, Wyandotte, Brahma, Jersey Giant, Leghorn, and the list goes on. There are quite a few to choose from. 

I got some Dominiques, Easter Eggers, and a Barred Rock. These breeds are fairly docile, medium size chickens, as well as lay a good amount eggs both brown eggs as well as colorful blue-green eggs. My Barred Rock is a little bigger than the others just a side note.

Where to get your chickens from?

Getting your chickens locally is a good idea as it allows you to see the baby chicks before buying them as well the environment they are kept in and it avoids additional stress via their travel through the shipping departments. Their environment is important to their health as it should be clean as well as not over crowded. I did not find any chickens locally at the time I made my decision so I decided to go with a highly reputable Hatchery that I found online. I got my chicks from Meyer Hatchery. They have a great reputation and have been around since 1985. I spoke with Kara from the hatchery and she was extremely helpful when my baby chicks arrived as I had tons of questions just wanting to be a good chicken mama.

Receiving your Baby Chicks.

It is important to know when your chicks have left the hatchery as well as when they will arrive at your local Post Office. The hatchery should provide you with a tracking number. Call your post office ahead of time to notify them that you are expecting some baby chickens and that you wish to be notified as soon as they come in.

My post office told me the general time of arrival for livestock and gave me a telephone number to call to check to see if they had arrived.  PLEASE DO NOT let your baby chickens just sit at the post office all day.

Keep in mind that the baby chicks need proper warmth, food, and water and the travel time can be a bit stressful for them. The longer they go without the necessities the more at risk you are of having them arrive dehydrated, over heated, too cold, or even worse, dead.

Babies Health.

Once your Brooder is set up one of the first things you need to check for when your chicks arrive is pasty butt. Pasty butt occurs when the baby chick poops and it gets stuck in the fur and it blocks their vent (butt hole) and this can cause some major issues.

Take care of this immediately by taking a damp warm soft paper towel and gently wipe to soften the poop to remove it then dry their butt.

DO NOT PULL the poop out of their fur as it will pull out their fur as well. Be gentle as they are newborns.

BROODER (chick safe-environment)

The Brooder is the place that you will set up to keep your baby chickens safe and warm while they are growing until they are ready and old enough for their chicken coop. The brooder should be predator proof. I cannot stress this enough.

The young chicks are susceptible to all types of predators such as the family cat or dog, rodents, snakes. Be aware that even in your garage critters can get in to come and snatch up your new young baby chicks.

The Brooder- We repurposed a used a plastic tote with a locking lid. We then cut out a couple of large square holes in the lid then covered it (the holes) with hardware cloth. We used the type with small holes then securing the cloth with zip ties. If you wish to purchase a brooder and not make your own please follow the link below.

HEAT LAMP

Since the babies don’t have their feathers yet to regulate their body temperatures and they don’t have their mama to keep them warm they will need an outside source of heat. The babies need to be warmed with a heat lamp. I used a 250 Watt Red Brooder Heat Lamp Bulb for my heat source to keep them warm.

The regulated temperature should be a consistent 100 degrees Fahrenheit. One thing to consider is the temperature and how it will fluctuate which will possibly fluctuate the brooder temperature as well. Keep an eye on the internal brooder temperature to be sure that it doesn’t get too hot or too cold.

Decrease by 5 degrees the brooder temperature weekly until you reach the temperature that they will be held at in their coop (outside temperature). You are basically acclimating them to their new environment by reducing the temperature weekly.

BEDDING

Pine shavings work great for their bedding as it absorbs their urine, poop, odors, and also provides them with a comfy place to sleep. I have read that the pine shavings should be medium size and not actually like sawdust as this could cause respiratory issues with your new flock. Food for thought. Add about 1 inch of pin shavings to the bottom of the brooder.

FOOD

Starter Food for baby chicks, 20%-24% depending on the type of chickens you get. They need food at all times. Egg Layers-20% starter crumble. Meat chickens 22%-24% starter crumble.

WATER

For their first week add Vital-Pack (has vitamins and electrolytes) as well as Probiotics to their fresh cool water (not iced cold). Make this mixture daily and be sure that they always have enough and that it is fresh. Also, keep an eye on their water quality as they can be a bit messy as they scratch and kick pine shavings around. They need water at all times.

WATERER **(Please note! It’s Very Important!!)

To know that your baby chicks will drown if you put a bowl (even a small bowl) of water in their brooder. Please do not make this mistake. You will need to buy a drown-proof watering system for their brooder. I bought a small chick waterer lid that fits a mason jar and it that has a very narrow area for the babies to drink from as well as the sponge inserts for the watering container

VENTILATION

It is important for the health of the chicks to have proper ventilation so they are breathing fresh air as well as not getting over heated from the heat lamp.

BROODER SET UP

Put the heat source at one end of the brooder and their food and water at the other end. The brooder should be a variation of temperatures and not just 100 degrees throughout the entire brooder as they should be able to escape the heat to avoid getting over heated. The overall temperature should be comfortable for them. A happy flock will be active and all over the brooder. Give them plenty of space to move about as the brooder should be large enough so the chicks have space to run around. If the brooder is too small you will find them getting agitated with each other and stressed.

TOYS FOR CURIOUS AND PECKING CHICKS

I found that my baby chicks were pecking at each others beaks trying to get off the white tip also known as the Egg Tooth. I researched what to do as I was concerned they may poke each other in the eye by mistake. I read that if you put black dots with a permanent marker on the walls of the brooder or on some cardboard and place inside they will peck at the dots instead keeping them preoccupied.

Observe your chicks: Keep a close eye on your new arrivals to ensure that they stay healthy.

August 26, 2016 0 comment
0 FacebookTwitterPinterestEmail
BlogRecommendations

Live Composting Worms

by Angela April 17, 2016

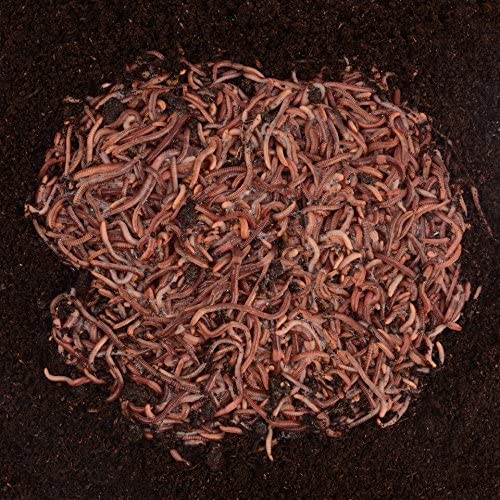
Having a worm farm is very rewarding as It is a wonderful way to connect to nature and it also helps to close a waste loop. Back to the basics, I say!

Composting worms can be your best friend in the garden-food forest, as they turn food scraps into a natural organic fertilizer called worm castings. I like to call these worm castings, black gold which is technically worm poop. The black gold or worm poop contains tons of minerals such as potassium, magnesium, phosphorus, calcium, and concentrated nitrates.

When adding these worm castings to your plants or fruit trees you will realize that a little goes a long way! It can even increase your plant’s or tree’s yield giving a larger and healthier harvest. You can also think of it as a soil conditioner (feeding the soil) as it truly can amend poor soil and even turn the worst growing mediums into a rich life-giving source.

The worms do all the work and you reap the benefits. Imagine that! If you are interested in getting a bulk quantity of live composting worms to really make a dent in your food scraps as well as start producing some black gold (worm castings) for your plants or trees then I recommend getting a bulk amount. I started with 2000+. However, you can start with as little as 1000+. Below is a link for bulk 2 pounds (approx. 1200 composting worms).

So what are you waiting for? Get started today by purchasing your composting worms here!


CHECK ON AMAZON

April 17, 2016 0 comment
0 FacebookTwitterPinterestEmail
gardening101
Blog

GARDENING 101: How to start a garden for beginners

by Angela March 7, 2016

Type of Garden bed: Raised bed, container garden, vertical garden, traditional gardening in rows, etc.  Each type of bed has its pros and cons.  It can be a preference of design, yield, as well as a space issue.  Either way, take careful consideration when choosing the style of garden you will start.  I chose raised garden beds for many reasons, garden design as I think raised beds have a nice visual appeal, as well as I am able to have more control of the soil composite.


Soil:  My preference is Organic compost which I was able to get in a bulk quantity from a local company.  I chose this route because I wanted a lot of really great soil and didn’t want to pay by the bag.  Buying bulk is definitely a more cost effective way to go.  Whatever soil you choose it is always important to have soil that is loose and drains well.  You can amend and enrich your native soil by adding chicken or cow manure, compost, worm castings, and natural mulch etc.


Pollinators: Plant a lot of flowers!  Flowers do more than just look pretty, they invite necessary pollinators to your garden.  Many vegetables and fruits require pollination to occur in order to produce fruits and veggies.  Hand pollinating is something that I have done in the past but I quickly learned just how important the pollinators are as they have a big job to do.


What to plant: The types of veggies and fruits to plant is a personal preference.  When choosing keep in mind how much space these plants take up verses how much they will yield.  For example: Watermelons and pumpkins take up A LOT of space.  So think about how many melons you will get and how much space they will take up and that should help you determine what to choose.  You may also want to consider choosing varieties that may do better in your growing zone or that may be more disease resistant in your climate. 


Where to plant: Take a good look at your yard, balcony, patio, etc., to see what areas are getting Full Sun, Partial Sun, Indirect Sun and for how long they are getting this sun as the proper amount of sunlight is very important for your plants to grow to their optimal size/yield.


When to plant: Growing Zone and time of year do play an important role when planning your garden.  I made this mistake when I first planted my garden and I planted EVERYTHING!  This was a bad idea because I was quickly approaching peak summer in Florida which is way too hot for many vegetables and I was just asking for trouble.  The good thing is I learned from my mistakes so I can share them with you and in return you can avoid the wasted time and effort.


Spacing: How many seeds or seedlings to plant in a specified amount of space is more important than you may think.  I discovered that less is more as I initially wanted to plant a bunch of seeds in my garden.  I soon came to realize that they would just choke each other out and not produce because there wasn’t enough nutrients for all of the plants to thrive.  Also, improper spacing does not allow for proper airflow which is very important to help avoid diseases.  It is very important to know how much space each plant requires before planting so take heed to the instructions on the back of your seed packet.  Some plants grow outward, some vertical, some will be more like a bush when others will vine and can grow several feet in length. 


Companion planting: Certain plants like or benefit from being planted next to each other and others can cause big problems whether it is competition for nutrients, or they both attract the same wrong insects, companion planting can be an excellent tool to use when planning out your garden.  Bio Diversity is crucial when planting a garden as it invites a wide variety of good bugs such as lady bugs which in return helps to provide a natural protection for your garden plants from the undesirable bugs.


Watering: Under-watering or overwatering can cause a lot of problems in your garden.  Boy I made this mistake in spades!  It is possible to love your plants too much by overwatering them. I loved some of my plants to death!  Overwatering can cause root rot and a multitude of problems with fungus’ and other diseases.  Under-watering can basically choke and starve the plant of much needed nutrients. Balance is key for a healthy plant.  I choose to hand water my plants as It allows me the opportunity to stay connected and observe the health of the plants on a regular basis.  I also water at the soil level, watering the roots only and not the leaves, fruit or blossoms of the entire plant as this can cause health issues and get the plant sick.


Seeds, seedlings, and newly transplanted plants will require the soil to stay moist in order to “take root” or germinate.  You should understand how much water each type of plant needs to stay healthy. Check the moisture level of your soil regularly.   A good way to check the moisture content of your soil is to physically check to see how wet or dry your soil is. You can do this by sticking your index finger in the soil approximately 2 inches (up to your second knuckle). It may be wet, moist, or even bone dry.  Whatever it is just stay on top of it and make necessary adjustments as the soil can dry up quickly depending the soil composite, amount of sunlight and/or rain it gets’, as well as how much the plants consume (some plants drink more than others).


Labeling: It seems so simple but it is easily forgotten.  Label your plants when you plant them as you will forget what seed you sowed.  I made this mistake with my tomato seedlings and some peppers and I had no idea what type I was growing…


ENJOY! Visit your garden daily if possibly as this is a way to get ahead of any problems like pests and/or diseases that may arise.  Things can get out of hand very quickly if you are not attending and observing your garden on a regular basis. Once the pests locate your garden they can overtake it and kill off the plants that you have put much time, love, and energy into. This is a lesson that I learned the hard way.  Love your plants and they will love you back.  Feed your plants and they will in return feed you and provide sustenance.


Check out my PERMACULTURE section for tips on how to garden and develop a food forest naturally.  THE PROBLEM IS THE SOLUTION!

March 7, 2016 0 comment
0 FacebookTwitterPinterestEmail
  • 1
  • 2

About Me

About Me

Permaculture Designer-Gardener-Creator

My journey started as an Artist-Chef by Profession and business owner for over 20 years… Although it has been very rewarding it doesn’t come close to being truly connected to and in touch with nature, going back to my Roots!

TikTok Feed

@4theloveofgarden

Recent Posts

  • Raising Monarch Butterfly

    January 9, 2023
  • Planting a Fruit Tree in Poor Soil

    June 22, 2020
  • How a garden changed my life.

    January 9, 2020
  • Composting worm farm for your garden.

    June 16, 2017
  • First time growing sweet potatoes.

    June 16, 2017
  • Facebook
  • Instagram
  • Pinterest
  • Youtube
  • Email
  • Tiktok

Disclaimer •  Terms Of Use • Privacy Policy

@2023 - All Right Reserved.


Back To Top
4TheLoveOfGarden
  • ABOUT ME
  • GARDENING 101
  • RECOMMENDATIONS
  • RESOURCES & AFFILIATE LINKS
  • SHOP
  • E-BOOK
  • Contact