Wednesday • May 07, 2025 •
4TheLoveOfGarden
Banner
  • ABOUT ME
  • GARDENING 101
  • RECOMMENDATIONS
  • RESOURCES & AFFILIATE LINKS
  • SHOP
  • E-BOOK
  • Contact
Category:

Blog

Blog

Raising Monarch Butterfly

by Angela January 9, 2023

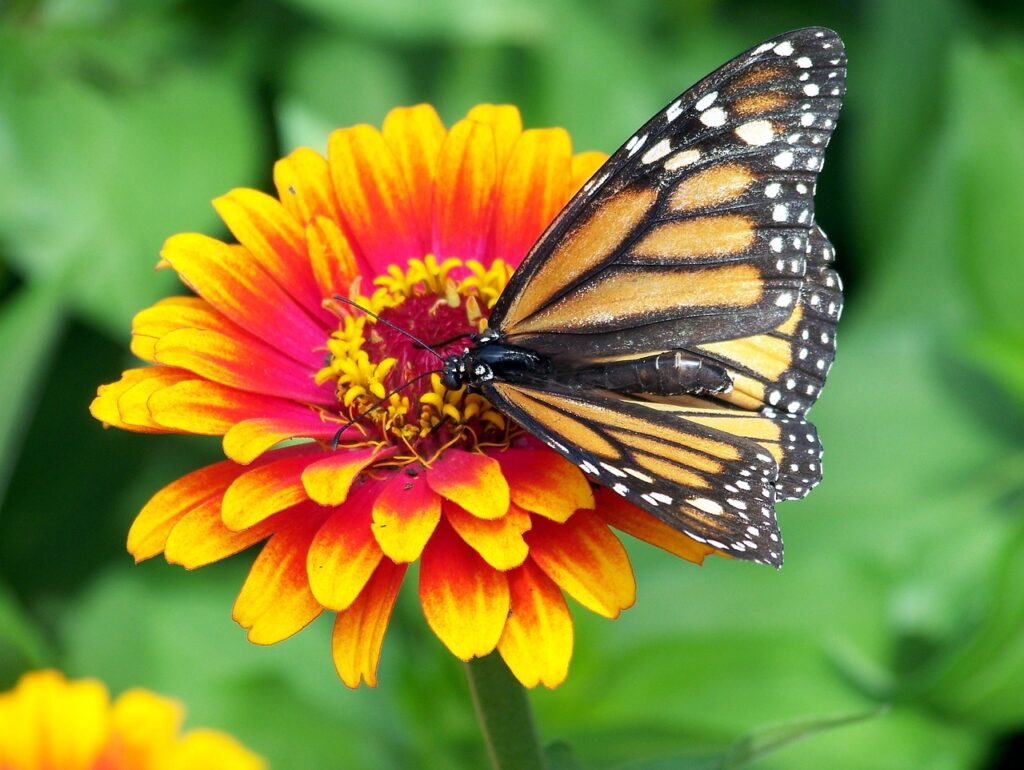
Help save the Monarch Butterfly! One of the easiest ways to help save this butterfly is to plant Milkweed in your yard and/or Garden. This act alone increases their chances of survival greatly! 

The Milkweedplant is a host plant for this Butterfly meaning, the Monarch will lay its’ eggs on this plant, after the eggs hatch the baby caterpillar (larva) will feed from this plant as it grows and finally it will go through its entire transformation into its “cocoon” (chrysalis/pupa) and then into a beautiful Monarch butterfly. 

It is an awesome transformation and to have a hand and be a part of it is very rewarding. If you wish to raise these butterflies then let’s get started.

Let’s talk about some important key points that you will need to know if you decide to raise the Monarch Butterfly.

EGG STAGE is 1-5 Days. Identify and locate the eggs: you can locate the eggs on the underside of the Milkweed leaves. The Monarch butterfly does not lay eggs in clusters but rather a single egg. The egg will be small and white. See the video for more details.

CATERPILLAR STAGE is 9-16 days. Keeping the baby caterpillars (larva) safe once they have grown is very important as this is a vulnerable time for them. They need to stay Dry. I carefully remove them from the Milkweed and put them in a mesh habitat that I purchased from Amazon, you can find a habitat for under $15. 

When handling the caterpillars or butterflies ALWAYS have clean and dry hands. It is best to try and refrain from touching them if possible. Only touch them when necessary.

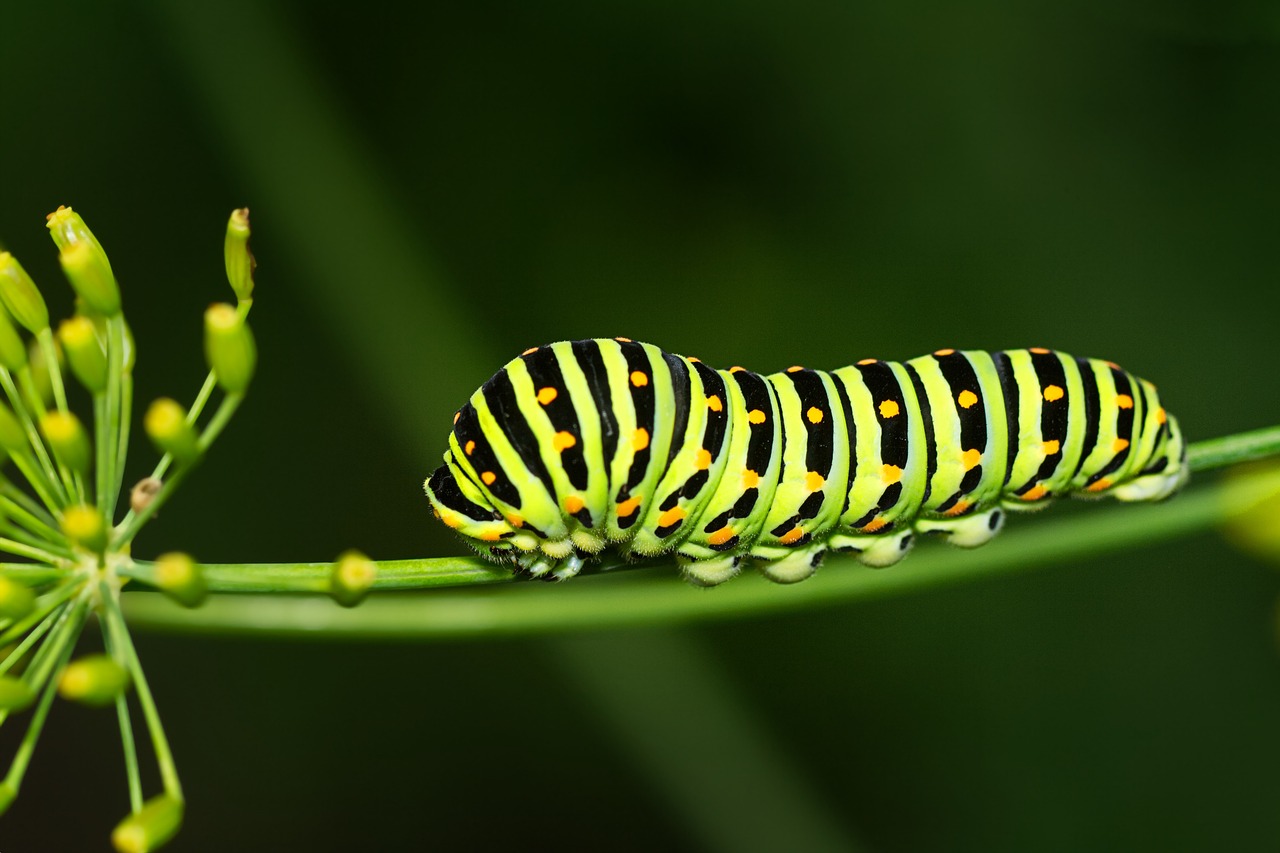
Feeding the caterpillars is important as they will need a constant supply of fresh Milkweed (not dried out). They will also need to have their habitat cleaned daily. You will realize that they eat a poop a lot! Keeping their environment clean, dry, as well as well ventilated is very important for their health and helps to increase their chance of survival.

CHRYSALIS STAGE is 10-14 days. The caterpillars will locate a spot in the habitat to hang from and when they start to hang into a J-Shape then you will know they are approaching the (chrysalis/pupa) stage. Do not touch the chrysalis when it is newly formed as it will need time to dry. 

Once the chrysalis turns black in appearance after several days it will be approaching its’ final moments before the adult butterfly emerges.

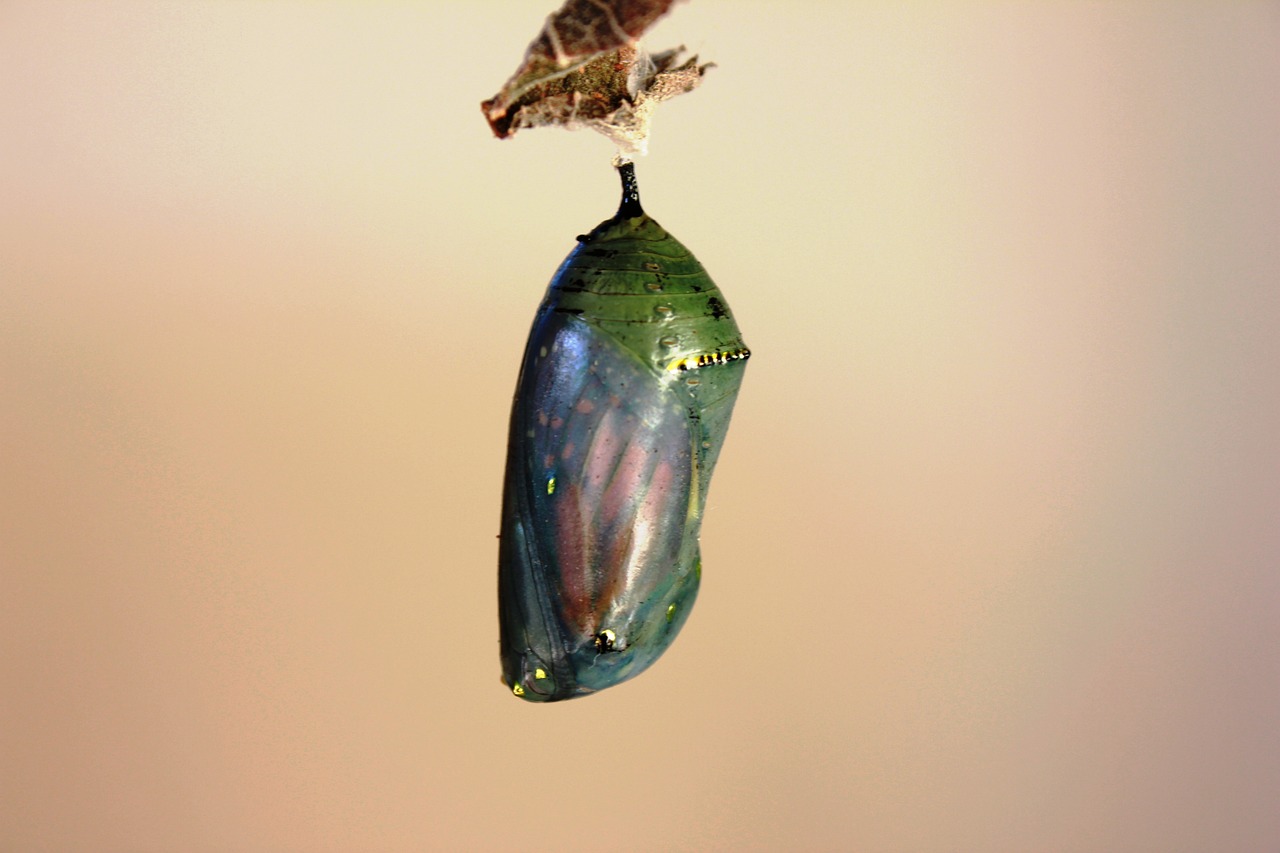
Once the new Adult butterfly emerges DO NOT TOUCH IT. Allow it to hang for at least 2-3 hours allowing its’ wings to dry. 

If you notice it has fallen down from the chrysalis stage and if it is having trouble climbing up to hang upside down then you may assist it by allowing it to climb on you to relocate it. 

If you assist do not touch their wings as you can damage the wings which can cause them to lose their ability to fly.

t is important to have flowers with nectar handy or make your own nectar to feed the butterfly before its’ new journey. I chose to ensure that the butterfly had the best possible chance to survive by making a homemade nectar and feeding them before I released them. If you choose this route then you will need a few items: Fresh water, 100% Real Honey, toothpick, and a bottle cap. 

Homemade Nectar Recipe ratio: 1 teaspoon honey to 6 teaspoons water then mix well. See the details in the video for the feeding technique.

WASH AND DRY YOUR HANDS BEFORE HANDLING THE BUTTERFLY.

Be sure that you release the butterfly on a dry/sunny day when the conditions are favorable. If you are not able to release them within 24 hours then you will need to continue feeding them until you do. Releasing the butterfly is a wonderful and rewarding experience as you have put much love, time, and care into raising these butterflies. Releasing the Monarch Butterflies is quite easy. Just open up the door and they will come out. Or you can allow them to climb on you and fly from there.

I want to thank you in advance for taking the time and care in saving this beautiful creature called Monarch Butterly! A collective effort will help to save the Monarchs!


January 9, 2023 0 comment
0 FacebookTwitterPinterestEmail
Blog

Planting a Fruit Tree in Poor Soil

by Angela June 22, 2020

Planting a fruit tree will probably be one of the most rewarding things that you decide to do…One of the benefits to planting fruit trees is the continuous production it gives year after year.

In this video I am planting a FlordaPrince Peach Tree LPrunus persica) which will be one among many varieties of fruit trees that I am adding to our backyard. I’m so excited! I chose this particular variety of peach tree because it only requires 150 chill hours and it can be a very prolific producer. To understand chill hours let me try and break it down for you. A chill hour is equal to an hour that the fruit tree is exposed to cooler temperatures. These temperatures range from 32 degrees Fahrenheit to 45 degrees Fahrenheit. So, my FlordaPrince Peach tree will need to spend 150 hours annually in-between this range of temperature in order to produce an abundance of fruit and to help maintain a healthier tree as it keeps natures cycle in balance.

The two most important things that I want you all to remember is HIGH & TIGHT! I learned this from watching Pete at GreenDreamsFL.

Let me explain…. You will want to plant the tree (root system) high. Planting it HIGH allows the roots ample *enriched-amended soil to feed from before reaching the sand or other less desirable soil that you may have to work with. This also helps to alleviate the roots from just sitting in water as this is called “Wet Feet” and fruit trees do not like to have wet feet as this can lead to root rot and other diseases. 

Now, the next important thing to do is to pack the soil around the root system nice and TIGHT as it needs to be compact and pressed tightly in order for the roots to maintain proper contact for feeding and support.

Fruit trees will want to have full sun as this encourages blossoms and in return fruit. Plant your tree in a location that allows for a minimum of 6/8 hours Full Sun Daily. 

Before planting your new tree be mindful of trees and other structures that may cast shadows upon your newly planted fruit tree which could inhibit its’ growth. Plant it in the Sun and watch it Grow!

It is important to keep the roots moist initially after planting until the tree is established and “taken root” so to speak. Keeping the roots and the soil around the roots moist (NOT WET) as it encourages growth.

Once established you will want to research the water requirement for the particular type of fruit tree that you are planting.

June 22, 2020 0 comment
0 FacebookTwitterPinterestEmail
Blog

How a garden changed my life.

by Angela January 9, 2020

I am forever changed! How can a Garden change someones life you may ask?  Well, it all started with a small garden, composting, then we got a few chickens…. Next thing I knew we started planting fruit trees to create a food forest in our back yard, but before I get ahead of myself let me go back to the beginning, my childhood. My childhood had such an influence in my adulthood as I will soon explain.

Ever since I was young I have just loved nature…. One of the memories that stands out most is playing in my grandmas’ garden and digging for earthworms with my cousin under the heat of the summer sun. Ahh.. I can still remember the texture of the rich black soil in-between my fingers and all the different smells of the garden veggies. I can hear the crisp snap of the green beans and that noise that only corn can make when it’s being shucked and I can just taste the juiciness of those brightly colored tomatoes still warm from the sun picked off the vine. I remember the night sky lit with fire-flies…. I can tell you without a doubt that I am blessed to have experienced the many different and beautiful miracles that a garden and rich soil can bring. I am so happy that I had the opportunity to experience this as a child as it made such an impact on me as an adult I now realize.

I hold dear such fond memories of visiting my grandma in the Midwest and having so many wonderful summers there as it will always be my starting point and where I go back to for inspiration. This is where I was taught the value that the earth has and that it is a relationship that we have with it and with ourselves. Little did I know just how much this would mould my passions in the future. Now fast forward about 30 years…

I have been saying for so too long… I know the difference between a home grown and a store bought tomato and I say no more tasteless “perfect” tomatoes that offer practically no nutritional value to our bodies! So it finally begins…. A Garden is Born…. A new person is reborn…. A new Passion for Life and Nature has been rekindled! So my new journey begins, an evolution of a Chef and Gardener turned permaculturalist. It was actually a natural progression.

A Pandemic called Covid-19 had us on lockdown. Believe it or not, being locked down and taking a break from “business as usual” was a blessing for me, I just hadn’t realized it yet. Sometimes what seems to be a negative can actually be a blessing in disguise. You never know what life has in store for you just beyond the horizon. 

So, time to turn home grown lemons into lemonade and add some fresh strawberries and basil from the garden, shall we? Let’s begin! I am an Artist and Chef by Profession. Although it is very rewarding it doesn’t come close to being truly connected to and in touch with nature. I have a spark that has ignited in my soul once again and my heart smiles! So much so that it has caused me to rethink my purpose and direction in life. The people in my life tell me that they can see a change in me and say I glow when I talk about the future and all that is to come.

Now, let me tell you a little bit about how my life has changed since I started a garden and how the light bulb went off like a lightning bolt as one bit of information has lead me to the next, like digging for the treasure of a lifetime. Having this relentless desire to reconnect with nature has lead me to a path of uncovering the keys to living a balanced and healthy life, working alongside and with nature, giving back in ways that make a difference beyond measure, tapping into a more simplistic way of life, as well as learning that there is possibly a simple solution to our global crisis of hunger and climate change.

The wealth of experience as well as knowledge that I have learned in such a little amount of time is amazing as nature is such a beautiful teacher. If you really observe and pay close attention, nature can really teach you so much! Realizing that there is a whole ecosystem involved with having a balanced and healthy garden blew my mind. There are so many organisms seen and unseen that have a crucial role to play as we are all important and need each other. Healthy soil is our answer.

There are a couple of films-documentaries that I watched that opened my eyes to so much as it helped me to discover and put a name to the “calling” and pulling that is within me. I didn’t realize it but Permaculture is my answer, my passion! I watched both of these films and cried like a baby the whole time, realizing the yearning that I have inside me is to create a living sanctuary. Realizing the dream, I believe that we can experience a real life Garden of Eden right here on this planet if we take a small step collectively and heal our soil. The clock is ticking…

The Biggest Little Farm (2018)

The Biggest Little Farm: The Return (2022)

Kiss the Ground (2020)

January 9, 2020 0 comment
0 FacebookTwitterPinterestEmail
Blog

What is Permaculture?

by Angela December 5, 2016

 Is Permaculture the answer to sustainability… to our permanence as a society… as a world? Is it the answer to world hunger? To our climate crisis? Could it really be that simple? I have been asking myself these questions and I recently discovered that it just may be. 

This discovery gives me hope and excitement but also gives cause for great concern as to why so many don’t know about this?!? Why, when we have information at our fingertips and immediate access to the latest… Why doesn’t the world know about something that is so important and so impactful as our very existence as a whole depends on it…. Why?

Well, It is time to share before it is too late! I believe I have been called, my purpose! My Passion!

(more…)
December 5, 2016 0 comment
0 FacebookTwitterPinterestEmail
BlogRecipe

Chow Recipe

by Angela December 2, 2016

CHOW! is a beautiful and refreshing dish served in most all households in Trinidad as a staple. It is healthy to the body and delightful to the taste buds to say the least! It touched my soul! Ahhhh… So delicious!!!!

It can range from sweet to tart but is traditionally a mixture of sliced fresh fruits and select veggies, garlic, culantro and spicy peppers, put together in a special way that seems almost magical! WOW! 

Make it to your own liking with many different combinations of fruits but just make it! You won’t regret it! It is an absolutely amazing dish and will now be a staple in my home.


Ingredients

1 Guava sliced thin

1 Cucumber sliced thin (half of peel left on)

2 sweet oranges use segments and juice

2 Carambola (Starfruit- 5 Finger) sliced

1 Mango large dice

6 Strawberries sliced

1 jalapeño minced

2 garlic cloves minced

Salt & Pepper to taste

1-2 Limes juiced

Preparation

1 Bunch Culantro chopped (Recao, Culantro, Cilantro ancho, Mexican Coriander)

In a large bowl combine all the ingredients and stir gently. Allow it to sit refrigerated for approximately 1/2 hour before serving. This allows the dish to come together nicely infusing all those amazing complex flavors! Enjoy!

*I also added a few sweet cherry tomatoes (halved) although this isn’t in a traditional Trinidad chow.

December 2, 2016 0 comment
0 FacebookTwitterPinterestEmail
Blog

Raising Backyard Chickens

by Angela August 26, 2016

How to care for baby chicks-chickens
(brooder, feed, water)?

You may be asking yourself if you should get chickens or not. I did the same thing for quite awhile…. Finally, after much thought and research I finally did it and I am very happy with my decision. I have learned so much so far and thought it best to pass along some valuable tips! So, here you go!

There are several things to consider when making this decision as it is quite a commitment. Ask yourself why…. Why do you want chickens? You may want them as pets, to lay eggs, to eat or a combination. I personally am not going to eat my chickens as that isn’t my cup of tea so to speak but I will use their eggs, their poop for fertilizer for my garden-food forest, and care for them as pets.

What kind of chicken to get?

So, now that you have decided to get chickens let’s talk about what kind of chickens you should choose. There are all types of chickens to consider and it is important to look at their inherit qualities before making a choice and not just going by appearance alone. Qualities like are they good Egg Layers? Are they Meat chickens or both? 

Are they big, small, hens, roosters, docile, etc.. It is important to know the facts before you start your flock. Some chickens are more tolerant of the heat or cold, some will lay more eggs, some are more docile than others, etc. and the list goes on. Know what you intend to do with your chickens and research about the different breeds that will best fit your lifestyle. Some popular breeds are ISA Brown, Plymouth Rock, Australorp, Orpington, Easter Egger, Sussex, Wyandotte, Brahma, Jersey Giant, Leghorn, and the list goes on. There are quite a few to choose from. 

I got some Dominiques, Easter Eggers, and a Barred Rock. These breeds are fairly docile, medium size chickens, as well as lay a good amount eggs both brown eggs as well as colorful blue-green eggs. My Barred Rock is a little bigger than the others just a side note.

Where to get your chickens from?

Getting your chickens locally is a good idea as it allows you to see the baby chicks before buying them as well the environment they are kept in and it avoids additional stress via their travel through the shipping departments. Their environment is important to their health as it should be clean as well as not over crowded. I did not find any chickens locally at the time I made my decision so I decided to go with a highly reputable Hatchery that I found online. I got my chicks from Meyer Hatchery. They have a great reputation and have been around since 1985. I spoke with Kara from the hatchery and she was extremely helpful when my baby chicks arrived as I had tons of questions just wanting to be a good chicken mama.

Receiving your Baby Chicks.

It is important to know when your chicks have left the hatchery as well as when they will arrive at your local Post Office. The hatchery should provide you with a tracking number. Call your post office ahead of time to notify them that you are expecting some baby chickens and that you wish to be notified as soon as they come in.

My post office told me the general time of arrival for livestock and gave me a telephone number to call to check to see if they had arrived.  PLEASE DO NOT let your baby chickens just sit at the post office all day.

Keep in mind that the baby chicks need proper warmth, food, and water and the travel time can be a bit stressful for them. The longer they go without the necessities the more at risk you are of having them arrive dehydrated, over heated, too cold, or even worse, dead.

Babies Health.

Once your Brooder is set up one of the first things you need to check for when your chicks arrive is pasty butt. Pasty butt occurs when the baby chick poops and it gets stuck in the fur and it blocks their vent (butt hole) and this can cause some major issues.

Take care of this immediately by taking a damp warm soft paper towel and gently wipe to soften the poop to remove it then dry their butt.

DO NOT PULL the poop out of their fur as it will pull out their fur as well. Be gentle as they are newborns.

BROODER (chick safe-environment)

The Brooder is the place that you will set up to keep your baby chickens safe and warm while they are growing until they are ready and old enough for their chicken coop. The brooder should be predator proof. I cannot stress this enough.

The young chicks are susceptible to all types of predators such as the family cat or dog, rodents, snakes. Be aware that even in your garage critters can get in to come and snatch up your new young baby chicks.

The Brooder- We repurposed a used a plastic tote with a locking lid. We then cut out a couple of large square holes in the lid then covered it (the holes) with hardware cloth. We used the type with small holes then securing the cloth with zip ties. If you wish to purchase a brooder and not make your own please follow the link below.

HEAT LAMP

Since the babies don’t have their feathers yet to regulate their body temperatures and they don’t have their mama to keep them warm they will need an outside source of heat. The babies need to be warmed with a heat lamp. I used a 250 Watt Red Brooder Heat Lamp Bulb for my heat source to keep them warm.

The regulated temperature should be a consistent 100 degrees Fahrenheit. One thing to consider is the temperature and how it will fluctuate which will possibly fluctuate the brooder temperature as well. Keep an eye on the internal brooder temperature to be sure that it doesn’t get too hot or too cold.

Decrease by 5 degrees the brooder temperature weekly until you reach the temperature that they will be held at in their coop (outside temperature). You are basically acclimating them to their new environment by reducing the temperature weekly.

BEDDING

Pine shavings work great for their bedding as it absorbs their urine, poop, odors, and also provides them with a comfy place to sleep. I have read that the pine shavings should be medium size and not actually like sawdust as this could cause respiratory issues with your new flock. Food for thought. Add about 1 inch of pin shavings to the bottom of the brooder.

FOOD

Starter Food for baby chicks, 20%-24% depending on the type of chickens you get. They need food at all times. Egg Layers-20% starter crumble. Meat chickens 22%-24% starter crumble.

WATER

For their first week add Vital-Pack (has vitamins and electrolytes) as well as Probiotics to their fresh cool water (not iced cold). Make this mixture daily and be sure that they always have enough and that it is fresh. Also, keep an eye on their water quality as they can be a bit messy as they scratch and kick pine shavings around. They need water at all times.

WATERER **(Please note! It’s Very Important!!)

To know that your baby chicks will drown if you put a bowl (even a small bowl) of water in their brooder. Please do not make this mistake. You will need to buy a drown-proof watering system for their brooder. I bought a small chick waterer lid that fits a mason jar and it that has a very narrow area for the babies to drink from as well as the sponge inserts for the watering container

VENTILATION

It is important for the health of the chicks to have proper ventilation so they are breathing fresh air as well as not getting over heated from the heat lamp.

BROODER SET UP

Put the heat source at one end of the brooder and their food and water at the other end. The brooder should be a variation of temperatures and not just 100 degrees throughout the entire brooder as they should be able to escape the heat to avoid getting over heated. The overall temperature should be comfortable for them. A happy flock will be active and all over the brooder. Give them plenty of space to move about as the brooder should be large enough so the chicks have space to run around. If the brooder is too small you will find them getting agitated with each other and stressed.

TOYS FOR CURIOUS AND PECKING CHICKS

I found that my baby chicks were pecking at each others beaks trying to get off the white tip also known as the Egg Tooth. I researched what to do as I was concerned they may poke each other in the eye by mistake. I read that if you put black dots with a permanent marker on the walls of the brooder or on some cardboard and place inside they will peck at the dots instead keeping them preoccupied.

Observe your chicks: Keep a close eye on your new arrivals to ensure that they stay healthy.

August 26, 2016 0 comment
0 FacebookTwitterPinterestEmail
  • 1
  • 2

About Me

About Me

Permaculture Designer-Gardener-Creator

My journey started as an Artist-Chef by Profession and business owner for over 20 years… Although it has been very rewarding it doesn’t come close to being truly connected to and in touch with nature, going back to my Roots!

TikTok Feed

@4theloveofgarden

Recent Posts

  • Raising Monarch Butterfly

    January 9, 2023
  • Planting a Fruit Tree in Poor Soil

    June 22, 2020
  • How a garden changed my life.

    January 9, 2020
  • Composting worm farm for your garden.

    June 16, 2017
  • First time growing sweet potatoes.

    June 16, 2017
  • Facebook
  • Instagram
  • Pinterest
  • Youtube
  • Email
  • Tiktok

Disclaimer •  Terms Of Use • Privacy Policy

@2023 - All Right Reserved.


Back To Top
4TheLoveOfGarden
  • ABOUT ME
  • GARDENING 101
  • RECOMMENDATIONS
  • RESOURCES & AFFILIATE LINKS
  • SHOP
  • E-BOOK
  • Contact